ShopDreamUp AI ArtDreamUp

Deviation Actions
Full Access to All
Great way to support me! Full access to all previous and future exclusive content. All my galleries will add new images periodically, don't miss it!
$25/month


Suggested Deviants


Suggested Collections


You Might Like…


![Rugrats: Reptar [Code-Re]](https://images-wixmp-ed30a86b8c4ca887773594c2.wixmp.com/f/89b9c0b1-6b02-46b6-b037-131533eaf81f/desg6h4-a4b26345-257b-4054-a83c-5c96c74ceb97.jpg/v1/crop/w_184,h_184,x_17,y_0,scl_0.14568487727633,q_70,strp/rugrats__reptar__code_re__by_avgk04_desg6h4-92s-2x.jpg?token=eyJ0eXAiOiJKV1QiLCJhbGciOiJIUzI1NiJ9.eyJzdWIiOiJ1cm46YXBwOjdlMGQxODg5ODIyNjQzNzNhNWYwZDQxNWVhMGQyNmUwIiwiaXNzIjoidXJuOmFwcDo3ZTBkMTg4OTgyMjY0MzczYTVmMGQ0MTVlYTBkMjZlMCIsIm9iaiI6W1t7ImhlaWdodCI6Ijw9OTI5IiwicGF0aCI6IlwvZlwvODliOWMwYjEtNmIwMi00NmI2LWIwMzctMTMxNTMzZWFmODFmXC9kZXNnNmg0LWE0YjI2MzQ1LTI1N2ItNDA1NC1hODNjLTVjOTZjNzRjZWI5Ny5qcGciLCJ3aWR0aCI6Ijw9MTI4MCJ9XV0sImF1ZCI6WyJ1cm46c2VydmljZTppbWFnZS5vcGVyYXRpb25zIl19.5LTzF7VeYTJgNmPDdNZfUczRW32D85jgVg_btwgBeoA)
![Rugrats: Reptar [Code-Re]](https://images-wixmp-ed30a86b8c4ca887773594c2.wixmp.com/f/89b9c0b1-6b02-46b6-b037-131533eaf81f/desg6h4-a4b26345-257b-4054-a83c-5c96c74ceb97.jpg/v1/crop/w_92,h_92,x_9,y_0,scl_0.072842438638163,q_70,strp/rugrats__reptar__code_re__by_avgk04_desg6h4-92s.jpg?token=eyJ0eXAiOiJKV1QiLCJhbGciOiJIUzI1NiJ9.eyJzdWIiOiJ1cm46YXBwOjdlMGQxODg5ODIyNjQzNzNhNWYwZDQxNWVhMGQyNmUwIiwiaXNzIjoidXJuOmFwcDo3ZTBkMTg4OTgyMjY0MzczYTVmMGQ0MTVlYTBkMjZlMCIsIm9iaiI6W1t7ImhlaWdodCI6Ijw9OTI5IiwicGF0aCI6IlwvZlwvODliOWMwYjEtNmIwMi00NmI2LWIwMzctMTMxNTMzZWFmODFmXC9kZXNnNmg0LWE0YjI2MzQ1LTI1N2ItNDA1NC1hODNjLTVjOTZjNzRjZWI5Ny5qcGciLCJ3aWR0aCI6Ijw9MTI4MCJ9XV0sImF1ZCI6WyJ1cm46c2VydmljZTppbWFnZS5vcGVyYXRpb25zIl19.5LTzF7VeYTJgNmPDdNZfUczRW32D85jgVg_btwgBeoA)


Description
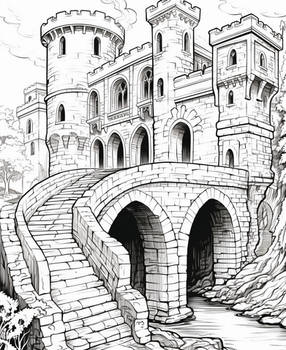
Hello guys! well first of all, what you have to know is that this image Is NOT A TUTORIAL at all! Also is NO WAY A SPEED PAINT. it took me about 14 to 16 hours to finish it. this is just some sort of process to record how I work and to kind of show you how I accomplished that.
There are many (way to many) tutorials on the internet, most of them are very useful") so making another one by me will have no sense, especially if I'm still learning what I'm doing and how to work.
so making another one by me will have no sense, especially if I'm still learning what I'm doing and how to work.
So this are basically the tutorials I used for this piece. hope there are useful for you to
Ok, first you have to check this out:
 fav.me/d78dvk2 what is this? this is one of the best exercises you can do to help your imagination flow! As you can see on the first frame of my image it's how everything started, with a shape
  (Smile)") so make sure you give it a try!
so make sure you give it a try!
Then, when the shape's done I start adding rough colors. start with the base color, then go dark with two or even three tones of the base color, and do the same for bright tones so you can start blend.
Now, there used to be a very cool tutorial here at DA about blending colors in Photoshop, It was a video I saw about 4 years ago and It totally blew my mind and change my way of painting forever! now I cannot find it any more") and I don't know who made it, but here's a video that explains the basics of that tutorial, it's mostly the same idea and method of how to blend colors, only brush and no smudge tool, (smudge tool bad!): Color blending That's how I blend colors in Photoshop.
and I don't know who made it, but here's a video that explains the basics of that tutorial, it's mostly the same idea and method of how to blend colors, only brush and no smudge tool, (smudge tool bad!): Color blending That's how I blend colors in Photoshop.
Now I always have trouble doing noses and shading them, so here's one very useful for that! 
For the hair I took a look at this two, even this one is for Sai it works the same on Photoshop with the right brush:
And this is one is nice to if you are looking to make some cool beard and have a lot of patience: fav.me/d3f2n8b
For the stone and cracky texture I recurred to this ones over here, I didn't do it exactly as a stone texture like the tutorial, but I got the idea from it  fav.me/d5u8u36
And for the Cigarette I used a reference of a real cigar and this two, one for the fire and one for the smoke smoke 
Fire fav.me/d5e7o5k
Hope you like it, and I hope all this tutorials are useful to you as they were for me!
You can see the full piece right here!
There are many (way to many) tutorials on the internet, most of them are very useful
So this are basically the tutorials I used for this piece. hope there are useful for you to
Ok, first you have to check this out:
fav.me/d78dvk2 what is this? this is one of the best exercises you can do to help your imagination flow! As you can see on the first frame of my image it's how everything started, with a shape Then, when the shape's done I start adding rough colors. start with the base color, then go dark with two or even three tones of the base color, and do the same for bright tones so you can start blend.
Now, there used to be a very cool tutorial here at DA about blending colors in Photoshop, It was a video I saw about 4 years ago and It totally blew my mind and change my way of painting forever! now I cannot find it any more
Now I always have trouble doing noses and shading them, so here's one very useful for that!
For the hair I took a look at this two, even this one is for Sai it works the same on Photoshop with the right brush:
And this is one is nice to if you are looking to make some cool beard and have a lot of patience: fav.me/d3f2n8b
For the stone and cracky texture I recurred to this ones over here, I didn't do it exactly as a stone texture like the tutorial, but I got the idea from it
And for the Cigarette I used a reference of a real cigar and this two, one for the fire and one for the smoke
Fire fav.me/d5e7o5k
Hope you like it, and I hope all this tutorials are useful to you as they were for me!
You can see the full piece right here!
Image size
400x532px 959.85 KB
© 2014 - 2024 Firebrander
Comments5
Join the community to add your comment. Already a deviant? Log In
This is beyond beautiful! Simply amazing work!